 Sign in
 mac_xxx
on July 23rd 2011
0
mac_xxx
on July 23rd 2011
0
It is helpful.

This tutorial demonstrates how to create a blue button with glassy 3D look in RealWorld Photos, RealWorld Paint.COM or compatible applications. The tutorial is suitable for beginners and shows how to use layers and draw with rounded rectangles and brush tools. A reference file is distributed with RealWorld Photos in the media library under the tag tutorial.
First, create a new document using the New raster image wizard. Set size to 128x128 pixels and enable layers.
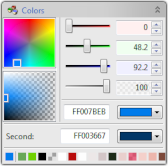
Set your primary (foreground) color to ff007beb and the secondary (background) color to ff003667 (or eventually to colors of your choice).
Switch Coordinates mode to Integral for easier positioning of drawn shapes.
Select the rectangle tool and set corner radius to 10 pixels. Switch to radial gradient fill style and use the active colors for gradient filling.
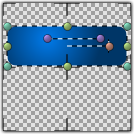
Draw a rounded rectangle of size 120x40 pixels with left corner at coordinates [4, 23]. Then use the magenta control handles to move the radial gradient towards the upper left corner as seen on the picture.
In this step, the floor reflection will be added. Duplicate the layer. Then use the Flip operation. Finally, use the Fade operation to make the lower part of the reflected image transparent.
Set layer opacity of the layer with reflection to 10%.
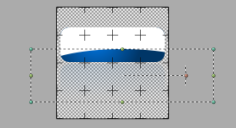
Creating a shiny reflected shape: Switch to white color and solid fill style. Add new layer. Draw exactly the same rounded rectangle as in the first step (it will be white this time). Then switch to completely transparent color and to the ellipse tool and subtract the lower part of the rectangle as seen on the picture.
Set layer opacity to 20%.
In this step, you'll create shine effect in another layer. Use white color again and draw a smaller rounded rectangle. Leave 3 pixels on each side (-> also lower the corner radius to 7 pixels).
Set layer opacity of the new layer to 20%.
Yet more shiny reflections in yet another layer. Switch to brush tool and draw 3 dots. Play with brush diameter, softness and intensity. Eventually use the Blur filter.

Set layer opacity of the new layer to 20%.
Add new layer. Switch to text tool and draw a text of your choice using font of your choice. The sample uses bold Tahoma font. Text can be drawn by clicking in the canvas with text tool active and then typing the letters on your keyboard. You can then re-position the text after that.
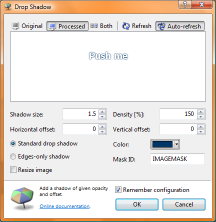
Now, for the final touch. Click the Layer effect toolbar button and then select the Drop Shadow effect or simply run the Drop Shadow filter from main menu. Setting up a layer effect is a bit harder, but it will save you the work if you intend to create multiple buttons with different texts. Set shadow diameter to 1.5, offset to 0 and a dark bluish color. Click OK and you are done.
Enjoy!
This tutorial was inspired by a similar tutorial for Adobe Photoshop available here
 Recent commentsmac_xxx
on July 23rd 2011
0
Recent commentsmac_xxx
on July 23rd 2011
0
It is helpful.
Gop
on October 12th 2011
0
It is too hard to follow for n00bs ie. took ages to find fade.
It is already given in the RW icon Editor's Tagged Library
Anonymous
on September 17th 2012
0
how to add hyperlink
Anonymous
on April 28th 2014
0
how do u get it
Anonymous
on February 1st 2016
0
You really need to know the program for this tutorial, it isn't for beginners...
Anonymous
on May 12th 2022
0
SIEMPRE EN INGLES?
 Say on
 reddit
 Facebook share