FLOODFILL is a drawing tool capable of filling areas consisting of similar pixels.
Flood-fill configuration panel
Behavior modes:
Simple flood fill - the color is spread from the clicked point.
Multi-point flood fill - user may click multiple points in the image and they all act as flood sources. Also, if they have different colors, all these colors are considered when determining similarity.
Matching modes:
RGBA - similarity of pixels is based on distance between individual color channels.
Alpha - similarity of pixels is based on their opacity.
Hue - similarity of pixels is based on their hue. Brightness and saturation are disregarded. Handy when you are using the tool to re-color an object with brighter and darker spots.
Brightness - similarity of pixels is based on their brightness. Hue and saturation are disregarded.
Tolerance parameter controls how different may the pixels be to be considered close enough to be painted.
How to use Flood fill
In most cases, the "Simple flood fill" mode should be used. Click on the image and eventually move the mouse with left button down to experiment with the source point. After the mouse button is released, the operation is applied.
If you wish to have more control over the process, use the "Multi-point flood fill" mode. In this mode, you can change color before applying the action and move the source point using a control handle. You can also select multiple source points. Apply the action with ENTER key, from a context menu or using a Down->Right mouse gesture.
Flood fill tool video tutorial
Narration transcript
How to use the flood fill (also known as the paint bucket) tool.
Open an image a switch to the flood fill tool. Its configuration panel appears. It allows you to select the number of source points, the matching mode and its tolerance.
So, click on the image. This is not a trivial case and the result is not optimal. We may need to switch to the "Multi-point" mode. Do it.
Note that after clicking now, a control point appears and you can freely drag it around or change the values in the configuration panel. Click again at a different place to designate a second flood source. Another thing you can change is the color (or use a more complex fill style). You can use any number of source points. To remove a source, drag it out of the canvas.
Let me open another image that is more suitable to demonstrate how the matching modes work.
I'll start in the multi-point mode. The RGBA mode takes all color channels into account. The Hue mode disregards brightness and saturation. The Brightness mode on the other hand disregards Hue. The Alpha mode only considers level of transparency. The tolerance setting controls the accuracy of the selected matching mode.
Be aware that using flood fill will usually make smooth edges not so smooth, because a pixel is either filled or left alone.
When filling you can also adjust transparency of the color and if you are using semitransparent color the "Replace" blend mode may be of use.
Now, click the Tool presets button and select Manage custom presets. In the window, click on the "Create new preset" icon. Name your new present and then carefully fill the Edit tool box with RETOUCH underscore FLOODFILL - user upper case letters and no spaces.
Click on the new item in the Tool presets popup menu. Note the retouch tool configuration above Flood-fill configuration panel.
Instead of simple filling, you can now Brighten, Darken, Desaturate, Colorize the affected pixels and more. Experiment with the available combinations.
Unlike the plain flood fill, the retouch modifier preserves the features of the affected pixels, namely the gradient and the reflection. Also, the edges remained smooth, because the pixels were not overwritten, merely affected by the selected operation.
The flood fill tool can also be used with a selection. If I create an ellipse selection and then use the flood fill tool, only the selected region is affected.
So, this is what the current flood fill tool can do. I hope you'll find it useful.
Scripting parameters
FLOODFILL tool can be used from scripts. The command in script may have 2 to 4 parameters:
pointX, pointY - coordinates of the initial pixel for flood filling. The pixel must lay inside the picture.
tolerance (optional) - maximum pixel difference in %. The default is 8%.
matching_method (optional) - one of the pixel matching methods "RGBA", "HLSA", "BRIGHTNESS", "ALPHA".
when I cut a figure using your excelent shape tool the cut figure goes to another layer when the picture is saved and it is opened by the the Window Picture Manager the cut out image is there but the background is Black .... same thing if you use PhotoScape or Paint brush ...How do you turn the background in the layer transparent?? I congratulate you once more for your great result with Realworld Paint
Vlastaon February 15th 20150
That is probably due to the limitations of the file format used. JPG for example does not support transparency and so transparent areas become black. Try saving the file as PNG or if it is a photo and you are concerned about file size, try lossy WebP.
Anonymouson July 2nd 20150
Ok, but how to change color, for example, under a withered tree or under the text? In the Paint, you can use the eraser to change a color, but it is too small and does not recognize even the minimum color difference. Does in this program is similar tool available?
Anonymouson July 6th 20160
when i fill, theres always one pixel left between that color and the line that i filled in... how vdo i get rid of this?
Vlastaon July 6th 20160
you can try increasing the tolerance, but if there are pixels that are mix of 2 colors, there will be something left
 Sign in
 FLOODFILL is a
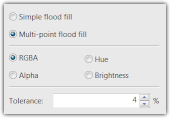
 Recent comments
 jorgelin1985
on February 15th 2015
0
jorgelin1985
on February 15th 2015
0
 cdl
cdl reddit
 Facebook share